VULNCON CTF 2021 IPS Writeup

VULNCON CTF 2021 IPS Writeup

Introduction

网络上很多<=2020年的kernel pwn writeup里的利用细节已经过时了, 像slub上的一些新的mitigations都没有被考虑进去. 今天学习了一个版本相对较新的kernel pwn, 分享一下分析和调试的过程.

题目下载: ips.tar.gz

IPS
0 solves / 500 points all available (heap) mitigations are on. perf_event_open is removed from the syscall table. get root.

Linux (none) 5.14.16 #2 SMP Mon Nov 22 19:24:06 UTC 2021 x86_64 GNU/Linux

TL;DR: 实现的syscall中计算idx的逻辑有漏洞, 可以拿到一块除了前0x10外都可控的UAF. 用UAF篡改一个msg_msg结构体可进行任意长度的leak, kernel base可以直接在leak中拿到, 而根据题目中存储模式的特点可以计算出slub上的地址, 进而计算出slab random. 最终用一个UAF改掉位于chunk中间的*next拿到任意地址写, 修改modprobe path, 在用户态触发modprobe完成提权.

Analysis

Challenge setting

启动脚本:

#!/bin/bash

cd `dirname $0`
qemu-system-x86_64 \
  -m 256M \
  -initrd initramfs.cpio.gz \
  -kernel bzImage -nographic \
  -monitor /dev/null \
  -s \
  -append "kpti=1 +smep +smap kaslr root=/dev/ram rw console=ttyS0 oops=panic paneic=1 quiet"

开启的保护:
– ktpi: 内核页表隔离. 由于我们是用修改modprobe path的方法, 所以不需要太关注
– smep+smap: 用户态代码不可执行+用户态数据不可访问, 但是没有给qemu传-cpu参数, 所以这两个参数其实是无效的, 因此也就有了ret2user的非预期解法(见下文)
– kaslr: 内核地址随机化, 常规的防护选项, 意味着我们需要leak

解包initramfs.cpio.gz, 查看系统init命令:
继续阅读“VULNCON CTF 2021 IPS Writeup”

vsCTF ezorange writeup

vsCTF ezorange writeup

前言

最近都在做程序分析和写kernel, 好久没玩pwn了, 周日晚上回宿舍刚好看到有一个vsCTF的比赛, 就顺手做了个glibc 2.32的堆题. 题目本身比较简单, 不过考察了一些高版本的libc的特性, 在这里记录一下作为备忘.

初步分析

首先看一下保护:

$ checksec --file=ezorange
    Arch:     amd64-64-little
    RELRO:    Partial RELRO
    Stack:    No canary found
    NX:       NX enabled
    PIE:      No PIE (0x3ff000)

Partial RELRO + No PIE, 强烈暗示修改.got.plt.

IDA打开看一眼, 只提供了malloc和edit+show, 没有free, 结合题目名字, 必然是要用House of Orange了.

漏洞点在Modify函数里, 有一个堆上的OOB:

__int64 __fastcall Modify(_BYTE **orange_list)
{
  unsigned int v2; // [rsp+10h] [rbp-10h] BYREF
  unsigned int v3; // [rsp+14h] [rbp-Ch] BYREF
  _BYTE *cur_ptr; // [rsp+18h] [rbp-8h]

  printf("Orange number: ");
  __isoc99_scanf("%u", &v2);
  if ( v2 > 1 || !orange_list[v2] )
  {
    printf("Not allowed!");
    exit(0);
  }
  cur_ptr = orange_list[v2];
  printf("Total %u cell in this orange\n", *((_DWORD *)orange_list[v2] - 2) & 0xFFFFFFF0);
  printf("Cell index: ");
  __isoc99_scanf("%u", &v3);
  printf("Current value: %hhu\n", (unsigned __int8)cur_ptr[v3]);// OOB
  printf("New value: ");
  return __isoc99_scanf("%hhu", &cur_ptr[v3]);
}

限制条件: 只能同时保有两个chunk pointer, malloc参数不能超过0x1000.

题解

太长不看版:

  1. 利用OOB+House of Orange来把top chunk送进unsorted bin, 从而leak libc和heap的基址
  2. 同上, 但是在House of Orange的最后一步之前, 将top chunk的大小缩减到tcache的范围, 这样新的top chunk就会被丢到tcache里
  3. 重复2, 拿到第2个tcache, 然后利用OOB构造fake chunk, malloc两次拿到fake chunk
  4. 覆写exit@got.plt为one gadget, 然后给一个非法输入触发get shell

逐步分析

继续阅读“vsCTF ezorange writeup”

绿色线程: 原理与实现

绿色线程: 原理与实现

引言: 绿色线程(Green threads)即在用户态实现的线程, 是相对于操作系统线程(Native threads)提出的概念. 绿色线程完全由编程语言运行时环境或VM进行调度管理, 实现的是合作式的”伪”并发. 在Java 1.1中, 绿色线程是JVM中唯一的线程模型, 当时的人们普遍认为绿色线程避免了频繁的内核态-用户态切换, 在一些特定场景下可以达到更好的性能. 然而, 随着操作系统和编程语言的发展, 绿色线程由于种种原因逐渐被抛弃. 直到近年来, Go语言中goroutine的广泛使用, 用户态线程管理这一技术才重新吸引了人们的目光.

Why Threads in User Space

在分析实现原理前, 我们首先来思考一下, 既然操作系统底层已经提供了的完整的线程支持, 为什么还需要用户态线程? 前面我们提到了Go近年来迅猛发展, 而这里的答案也正与goroutine擅长处理的场景有关: 高并发.

对于并发场景, 常见的处理方式有以下几种:

  1. 多进程, 例如Apach的Prefork模式
  2. 多线程+锁, Java开发中最常用的模式
  3. 异步回调+事件驱动, 例如node.js
  4. 用户态线程/协程/纤程/绿色线程, 例如goroutine

其中, 进程消耗系统资源相对较大, 因此多进程并不适合高并发场景; 多线程避免了进程的堆, 地址空间等资源的重复分配, 相比于多进程, 大大降低了多任务并行调度的开销; 回调+事件轮询的处理模型采用了不同的思路, 通过非阻塞的方式保持CPU的持续运转; 用户态线程则是将线程的调度逻辑从内核态转移到了用户态, 相较于多线程进一步地减少了调度的开销, 实现了更细粒度的控制.

用户态线程的优势主要在于:

  1. 调度代价小: 用户态线程避免了特权级的转换, 而且仅使用部分寄存器即可完成上下文切换(见下文实现).
  2. 内存占用少: 内核线程的栈空间通常为1-2MB, 用户态线程(如goroutine)栈空间最小可以到2KB, 一个golang程序可以轻松支持10万级别的goroutine运行, 作为对比, 1000个系统线程已经需要至少1-2GB的内存了.
  3. 解决回调地狱: 用户态线程可以简化异步回调的代码, 提升开发人员编码的简洁性和可读性.

实现原理

线程结构体

为了实现绿色线程, 我们首先需要确定描述一个线程需要哪些信息. 根据线程的定义不难发现, 描述线程的结构体应该包括:

  • 线程ID
  • 运行状态
  • PC
  • 通用寄存器

x86_64架构下, 上述线程描述可以用以下代码来表示:

struct Thread {
    _id: usize,
    stack: Vec<u8>,
    ctx: ThreadContext,
    state: State,
}

struct ThreadContext {
    rsp: u64,
    r15: u64,
    r14: u64,
    r13: u64,
    r12: u64,
    rbx: u64,
    rbp: u64,
}

enum State {
    Available,
    Running,
    Ready,
}

继续阅读“绿色线程: 原理与实现”

rCore-OS Lab5: Process

Lab5: Process

0x00 The Concepts and Syscalls

It’s hard to define what a process is. Usually it is a procedure in which the OS selects an executable file and performs the dynamic execution. During the execution there will be many interaction between the process and the hardware or virtual resources, and we know those are handled by the OS through syscalls. Besides, there are some important syscalls specially made for process management: fork/exec/waitpid:

  • fork: When a process (let’s name it A) call fork, the kernel will create a new process (let’s name it B) which is almost identical to A: they have exactly same stack, .text segment or other data segment content, and every registers except a0 which stores the return value of the syscall. They are in different address spaces but the bytes stores in these address space are exactly same at the moment fork returns. The only way a process can figure out whether it is the new process or the old parent is the returen value of fork: 0 for the new born process and pid of child process for the parent. This parent-child relation is very important in unix-like OS.
  • exec: This will help us run a new program in the current address space, use it together with fork we can easily create a process that runs a new program.
  • waitpid: When a process returns, the memory resources it have consumed cannot be fully recycled through the exit syscall, for eaxmple the current kernel stack. A typical solution for this is to mark the process as zombie, then it’s parent process do the rest recycle work and get the exit status through the waitpid syscall.

0x01 Data Structures for Process

RAII is heavily used to help us safe memory management. For a process, we bind its pid, kernel stack, and address space(MemorySet) to a TaskControlBlock. The TCBs ares stored in a tree formed by the parent-child relations(created through fork&exec) between processes:

pub struct TaskControlBlock {
    // immutable
    pub pid: PidHandle,
    pub kernel_stack: KernelStack,
    // mutable
    inner: UPSafeCell<TaskControlBlockInner>,
}

pub struct TaskControlBlockInner {
    pub trap_cx_ppn: PhysPageNum,
    pub base_size: usize,
    pub priority: usize,
    pub pass: usize,
    pub task_cx: TaskContext,
    pub task_status: TaskStatus,
    pub memory_set: MemorySet,
    pub parent: Option<Weak<TaskControlBlock> >,
    pub children: Vec<Arc<TaskControlBlock> >,
    pub exit_code: i32,
}

Here we use alloc::sync::Weak to wrap the parent pointer so that there will be no cyclic refernces between the parent and it’s child.

Another significant modification from previous chapter is that we split the original task manager module into Processor and TaskManager.
– The Processor module maintains the CPU’s states, including current process and idle task context. In a single-core CPU environment, we only create one gloable instance of Processor.
– The TaskManager stores all Arcs in a BTreeMap, so that we can easily fetch/remove or add/insert tasks(processes) with our scheduler.

pub struct TaskManager {
    ready_queue: BTreeMap<usize, Arc<TaskControlBlock>>,
    scheduler: Box<Scheduler>,
}

impl TaskManager {
    pub fn new() -> Self {
        let stride_scheduler: Scheduler = Scheduler::new();
        Self {
            ready_queue: BTreeMap::new(),
            scheduler: Box::new(stride_scheduler),
        }
    }

    pub fn add(&mut self, task: Arc<TaskControlBlock>) {
        // update pass for stride scheduler
        let mut task_inner = task.inner_exclusive_access();
        task_inner.pass += BIG_STRIDE / task_inner.priority;
        drop(task_inner);
        self.scheduler.insert_task(task.getpid(), task.clone().inner_exclusive_access().pass);
        self.ready_queue.insert(task.getpid(), task);
    }

    pub fn fetch(&mut self) -> Option<Arc<TaskControlBlock>> {
        let next_pid = loop {
            if let Some(next_pid) = self.scheduler.find_next_task() {
                // TODO how about wait state
                if self.ready_queue.contains_key(&next_pid){
                    break next_pid
                }
            } else {
                return None;
            }

        };
        let (_, task) = self.ready_queue.remove_entry(&next_pid).unwrap();
        Some(task)
    }
}

0x02 Process Management

继续阅读“rCore-OS Lab5: Process”

rCore-OS Lab4: Address Space

Lab4: Address Space

Address Space is a significant mechanism in modern operating system. By adding an abstract layer between code and physical memory, it frees the developers from the painful memory arrangement work, helping them focus more on their code other than the hardware stuff.

The following figure gives an overview of how Address Space works:

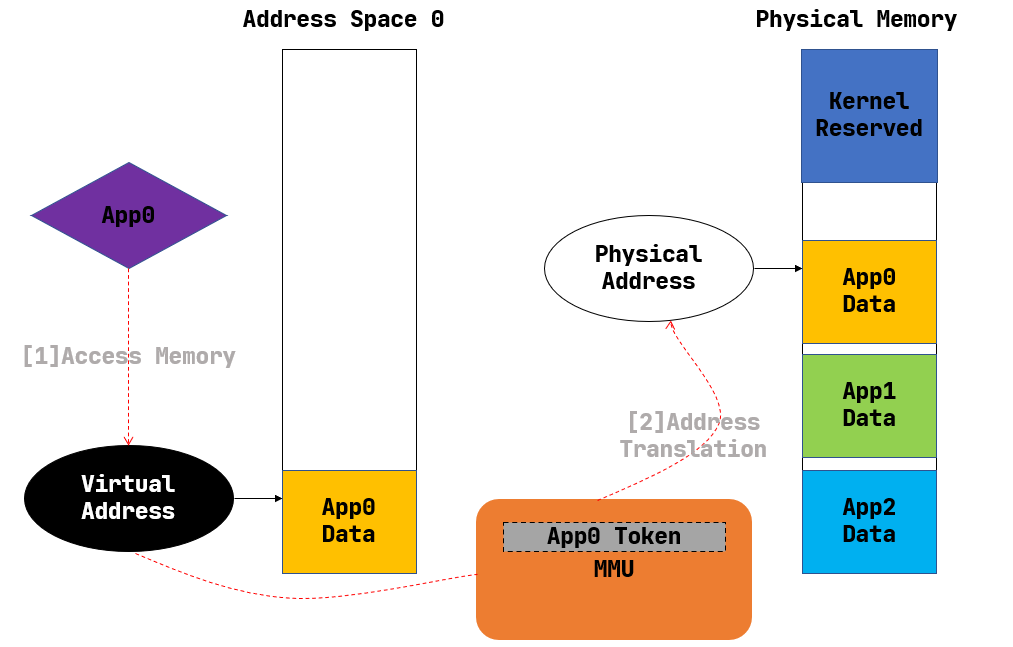
Having Address Space enabled, the codes can only see the Virtual Address. If a process wants to access any address virt_addr, it will be first translated to Physical Address by CPU’s MMU module according to the process’s page table.

0x00 Hardware supports for Multilevel Paging in RISCV

The MMU is disabled by default, thus previously any program are able to access any physical memory. We can enbale the MMU by setting a register named satp:

The above figure shows the meaning of bits in satp:

  • MODE controls how the MMU translate address. When MODE = 0 the MMU is disabled, and when ‘MODE’ = 8 the MMU use page table mechanism to translate the address.
  • ASID indetifies the address space by id, since we don’t have process implemented yet we just ignore it.
  • PPN is the physical page number of the root page table entry.

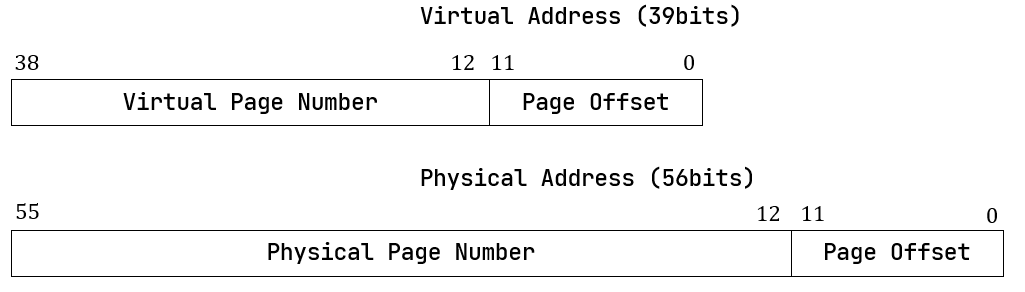
The address format under page table mechanism consists of two parts: page number and offset:

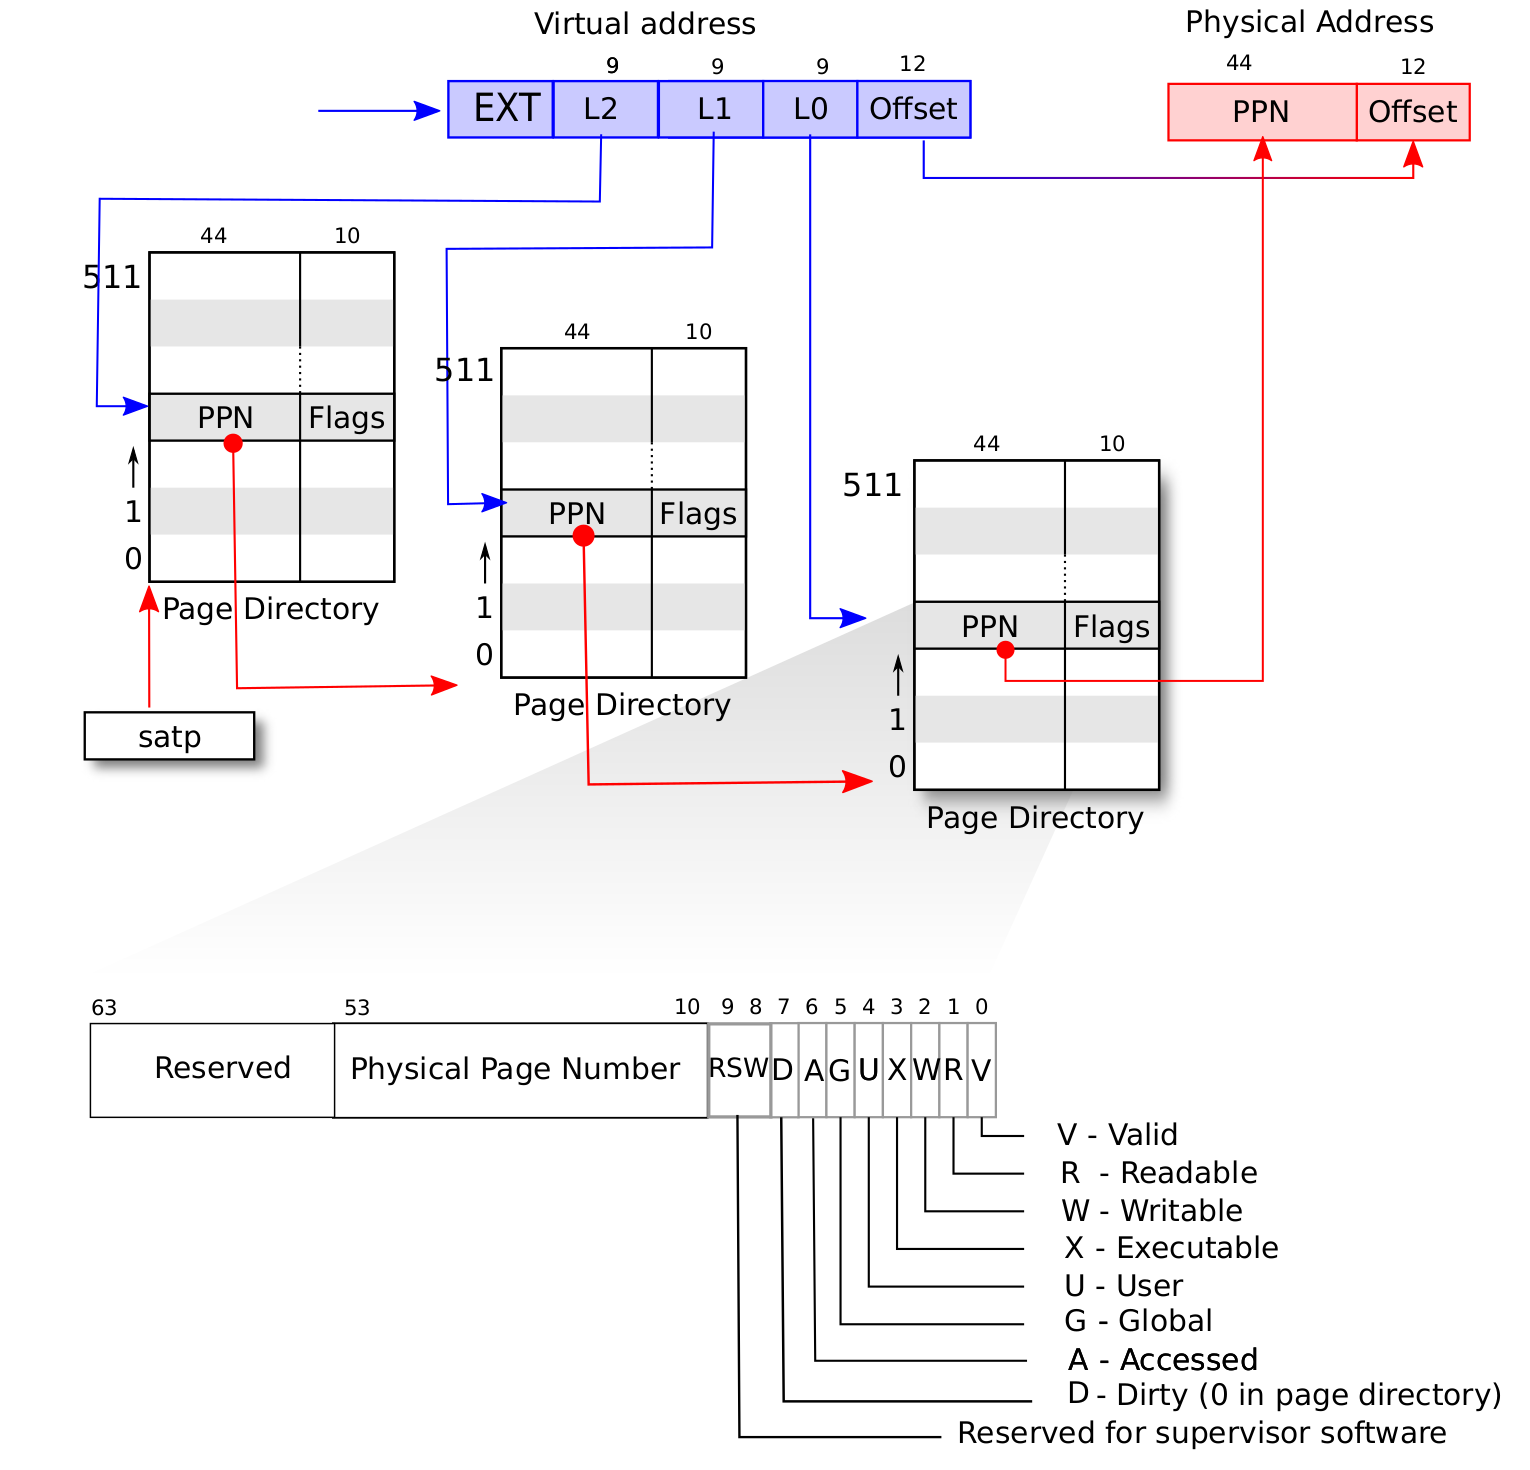
Each page table entry consists of 3 level virtual page number (vpn) and several flag bits:

With these knowledge we can easily understand how the MMU translates virtual memory address:

TLB

TLB (Translation Lookaside Buffer) works like some kinds of cache, note that we have to use sfence.vma instruction to refresh it after we change satp or any page table entry.

0x01 Address Space of Kernel and User

After satp is enabled, the memory of kernel and user applications are seperated, we need to carefully handle the interaction between different address spaces. In rCore, the designers use a Trampoline to bridge the kernel and usermode applications:

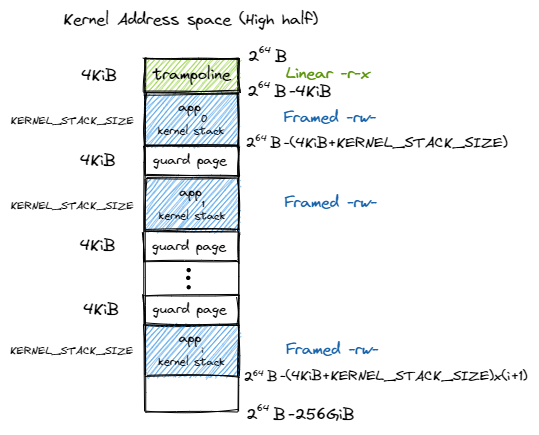
The virtual address of Trampoline is exactly same across each user spaces and the kernel space. Note that there is a guard page between kernel stacks. Those holes in the address space are settled to prevent buffer overflow damage in kernel stack.

The address space of the kernel is illustrated in the following figure:

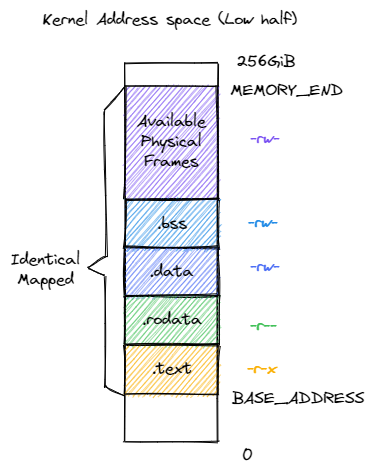
The permissions here are critical for system security: no page table can be both writable and executable. Besides, we use identical mapping here, so the kernel can read/write any user space memory in an easy way.

In user mode, the address space is quite familiar to us:

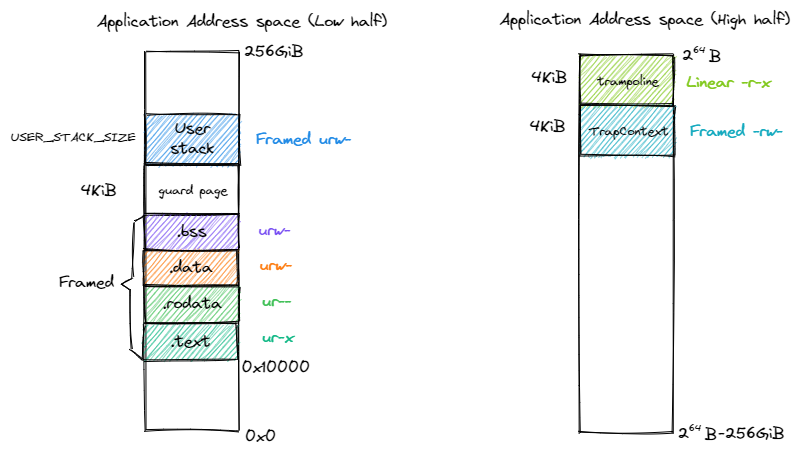
We palce the TrapContext just under the Trampoline.

0x02 Multi-tasking with Address Space

__all_traps and trap_return shoud take care of the address space switch. Note that for each task, we should set their TaskContext’s initial ra to trap_return. We don’t have the ra pushed in kernel stack for the first time to run a task so we have to handle this manually.

The syscall call stack is:

syscall: user space ecall -> __all_traps(trampoline) -> trap_handler -> do syscall -> trap_return -> __restore -> user space

The switch process is:
继续阅读“rCore-OS Lab4: Address Space”

SUSCTF 2022 tttree writeup

SUSCTF 2022 tttree writeup

前言

SUSCTF 2022 的 tttree 这道题目使用了2021 KCTF 春季赛一位师傅提出的混淆思路, 但是网上现有的公开WP(包括官方的)和混淆器的原作者都没有很好地讲清楚应该怎么去混淆. 比赛期间时间比较紧张, 很多人也来不及理清思路, 一些师傅甚至直接手撕汇编解题(orz). 综合了多位师傅的解题思路之后, 在这里总结出一份相对比较完善的去混淆思路(完整代码见文末), 希望能对读者有所帮助, 如有更好的思路, 欢迎与我交流.

0x00 初步分析

给了一个x64的Windows命令行程序:

tttree2.exe: PE32+ executable (console) x86-64, for MS Windows 

直接运行, 提示输入flag:, 随便输入之后返回error!.

IDA加载, 找到start函数, 发现是一个很短的汇编函数:

进一步发现, 几乎整个代码段都是相似的模式. 根据计算地址后是否直接retn可以将混淆模式分为两种, 第一种模式如下:

... ; 原来的汇编代码
push    rax
push    rax
pushfq
call    $+5
pop     rax
add/xor     rax, some_imm
mov     [rsp+40h+var_30], rax
popfq
pop     rax
retn

不难发现, 该段汇编代码的作用就是将call $+5的下一条指令的地址add或者xor上某个立即数, 再通过retn跳转到计算出来的新地址, 因此这种模式可以看作是一种jmp, 其通过将原来的线性汇编代码分割成多个小块, 并且随机打乱了顺序来进行混淆.

第二种模式如下:

push    rdx
push    rbx
pop     rbx
pop     rdx
push    rax
push    rax
pushfq
call    $+5
pop     rax
add     rax, 4A8Ch
mov     [rsp+10h], rax
popfq
pop     rax
push    rax
push    rax
pushfq
call    $+5
pop     rax
add     rax, 0FFFFFFFFFFFFCBEFh
mov     [rsp+10h], rax
popfq
pop     rax
retn

这里可以看作是两次JMP模式的组合. 区别在于, 第一次JMP模式中, 计算完跳转地址后没有立即用retn跳转, 而是又重新开始了新的一次JMP模式. 仔细一想就会发现这个模式等价于做了一次call, 其中第一次放到返回地址里的是call所在的上下文中的下一条指令, 而第二次放进去的是call所调用的函数的地址.

此外还有一些比较简单的无效指令混淆, 目的应该是增加动态调试的难度:

push    rax
pop     rax
push    rbx
pop     rbx
push    rcx
push    rdx
pop     rdx
pop     rcx

有了以上的分析基础, 就可以着手一步步来去除各种混淆了.

0x01 控制流重建

继续阅读“SUSCTF 2022 tttree writeup”

rCore-OS Lab3: Time-sharing Multi-tasking

Lab3: Time-sharing Multi-tasking

In lab2, we implemented a Batch-Processing OS, allowing users to submit a bunch of programs at once then just wait for the result(s). Besides, we have made some basic security checks to prevent memory fault(or attack) in user’s programs influencing the other ones or OS. Despite the large labor-saving, it is still a far cry from a modern OS.

Think about how the OS behaves nowadays: Multi-tasking(you feel like doing many works at the same time), Real-time interaction(whenever click or press a key you get responses instantly), Memory Management, I/O Devices Management, and Networking utilities. It is those features, supported by complicated underlay mechanisms, that let us operate computers in a satisfying and efficient way. And in this lab, we are going to address the Multi-tasking problem, which takes an essential step towards our modern OS target.

The basic idea of multi-tasking on a single CPU is very simple: we run each task for a small piece of time, then switch to the next task and repeat this procedure. If we switch fast enough then it looks like we are running many programs at the same time.

The cruxes:

  1. How do we allocate memory of the programs? We need to preserve the task context (registers, stack, etc) in memory so that when we switch back and everything goes fine as before.
  2. How to switch between tasks? The OS code cannot run when the user’s programs occupy the CPU, so we need to seize this power from the user’s programs, without destruction to them.
  3. How do we schedule those tasks? What is the proper time interval to perform task switching? How do decide which one should run next?

In the following parts, we will discuss these problems, one by one.

继续阅读“rCore-OS Lab3: Time-sharing Multi-tasking”

Insomni’hack teaser 2022 Pwn writeup

前言

偶然在推特看到的这个比赛, 搜了下似乎国内没什么人参加, 但是往年题目质量还不错(?), 摸鱼打了打, 4道pwn只做了2个, 剩下一个是Windows Pwn一个是GameBoy, 都不太熟= =.

onetestament

glibc 2.23的heap菜单题, some old tricks 😀

限制因素:

  • 能申请的mem size只有四种: 0x18 0x30 0x60 0x7c
  • 只有在add的时候可以leak信息, show函数是没用的
  • 用的是calloc, 会把申请到的chunk清零
  • 最多只允许调用11次calloc (0-10)
  • delete里用了一个标志变量判断是否有double-free

漏洞点:

  • editoff-by-one, 在可以改下一个chunk headersize
  • 读入菜单选项的函数存在一个字节的溢出, 可以把第4块chunk(编号从0开始)是否被free过的标志变量覆写, 从而达到double free

这里有一个小知识点, 在glibc-2.23/malloc/malloc.c__libc_calloc函数中(3259行):

  /* Two optional cases in which clearing not necessary */
  if (chunk_is_mmapped (p))
    {
      if (__builtin_expect (perturb_byte, 0))
        return memset (mem, 0, sz);

      return mem;
    }

可以看到calloc 函数不会把 mmap 系统调用拿到的内存清零, 这是因为mmap系统调用拿到的内存本身就是清零的, 为了节省性能开销这里就不再调用memset清了.

因此如果能覆写chunk的IS_MMAPED位, 就可以绕过calloc的清零操作. 参考chunk结构图可以发现当一个chunk的data部分大小为0x18时, 其利用edit中的off-by-one就正好可以覆盖下一个chunk的IS_MMAPED位:

那么现在思路其实很明确了, 主要步骤:

  1. 用0x18的chunk作为辅助编辑块, 负责修改其下一个chunk的IS_MMAPED绕过calloc的清零
  2. 0x7c大小的unsorted bin chunk泄露libc基址
  3. 0x60 大小的chunk做fastbin attack, 拿到一块指向__malloc_hook的fake chunk
  4. 覆写__malloc_hookone gadget, 调用一次add拿到shell
    继续阅读“Insomni’hack teaser 2022 Pwn writeup”

VSCode IDAPython 开发环境配置

VSCode IDAPython 开发环境配置

开发工具 版本
OS Windows 10
IDA Version IDA Pro 7.5
IDACode(VSCode插件) 0.3.0

0x00 安装IDACode插件

仓库地址 https://github.com/ioncodes/idacode

VSCode中的安装

直接在vscode的插件商店中搜索idacode安装即可

IDA中的安装

  1. 将代码仓库中的/ida目录下所有文件复制到本地IDA的plugins目录下,例如我的是C:\Program Files\IDA 7.5\plugins
  2. 修改上述文件夹中的idacode_utils/settings.py, 端口如无特殊需求保持默认即可, PYTHON设置为本地IDA所使用的python解释器, 例如我使用的是conda的默认解释器: PYTHON = "C:\\ProgramData\\Miniconda3\\python.exe"
  3. 给本地IDA所使用的python解释器安装依赖:python -m pip install --user debugpy tornado
  4. 此时重启IDA, 在插件目录中应该可以看到IDACode这一项, 单击可以看到output栏中有[IDACode] Listening on 127.0.0.1:7065的输出, 说明安装成功

0x01 配置VSCode开发环境

自动补全配置

在vscode的settings(json)中把本地IDA Python库的位置添加进去, 例如我的是 C:\Program Files\IDA 7.5\python\3, 则settings中添加的项为:

"python.autoComplete.extraPaths": [
   "C:\\Program Files\\IDA 7.5\\python\\3"
],
"python.analysis.extraPaths": [
   "C:\\Program Files\\IDA 7.5\\python\\3"
],

此时把ida相关的包import进来就可以用自动补全了:

image.png

连接VSCode与IDA

继续阅读“VSCode IDAPython 开发环境配置”