VULNCON CTF 2021 IPS Writeup

VULNCON CTF 2021 IPS Writeup

Introduction

网络上很多<=2020年的kernel pwn writeup里的利用细节已经过时了, 像slub上的一些新的mitigations都没有被考虑进去. 今天学习了一个版本相对较新的kernel pwn, 分享一下分析和调试的过程.

题目下载: ips.tar.gz

IPS
0 solves / 500 points all available (heap) mitigations are on. perf_event_open is removed from the syscall table. get root.

Linux (none) 5.14.16 #2 SMP Mon Nov 22 19:24:06 UTC 2021 x86_64 GNU/Linux

TL;DR: 实现的syscall中计算idx的逻辑有漏洞, 可以拿到一块除了前0x10外都可控的UAF. 用UAF篡改一个msg_msg结构体可进行任意长度的leak, kernel base可以直接在leak中拿到, 而根据题目中存储模式的特点可以计算出slub上的地址, 进而计算出slab random. 最终用一个UAF改掉位于chunk中间的*next拿到任意地址写, 修改modprobe path, 在用户态触发modprobe完成提权.

Analysis

Challenge setting

启动脚本:

#!/bin/bash

cd `dirname $0`
qemu-system-x86_64 \
  -m 256M \
  -initrd initramfs.cpio.gz \
  -kernel bzImage -nographic \
  -monitor /dev/null \
  -s \
  -append "kpti=1 +smep +smap kaslr root=/dev/ram rw console=ttyS0 oops=panic paneic=1 quiet"

开启的保护:
– ktpi: 内核页表隔离. 由于我们是用修改modprobe path的方法, 所以不需要太关注
– smep+smap: 用户态代码不可执行+用户态数据不可访问, 但是没有给qemu传-cpu参数, 所以这两个参数其实是无效的, 因此也就有了ret2user的非预期解法(见下文)
– kaslr: 内核地址随机化, 常规的防护选项, 意味着我们需要leak

解包initramfs.cpio.gz, 查看系统init命令:
继续阅读“VULNCON CTF 2021 IPS Writeup”

绿色线程: 原理与实现

绿色线程: 原理与实现

引言: 绿色线程(Green threads)即在用户态实现的线程, 是相对于操作系统线程(Native threads)提出的概念. 绿色线程完全由编程语言运行时环境或VM进行调度管理, 实现的是合作式的”伪”并发. 在Java 1.1中, 绿色线程是JVM中唯一的线程模型, 当时的人们普遍认为绿色线程避免了频繁的内核态-用户态切换, 在一些特定场景下可以达到更好的性能. 然而, 随着操作系统和编程语言的发展, 绿色线程由于种种原因逐渐被抛弃. 直到近年来, Go语言中goroutine的广泛使用, 用户态线程管理这一技术才重新吸引了人们的目光.

Why Threads in User Space

在分析实现原理前, 我们首先来思考一下, 既然操作系统底层已经提供了的完整的线程支持, 为什么还需要用户态线程? 前面我们提到了Go近年来迅猛发展, 而这里的答案也正与goroutine擅长处理的场景有关: 高并发.

对于并发场景, 常见的处理方式有以下几种:

  1. 多进程, 例如Apach的Prefork模式
  2. 多线程+锁, Java开发中最常用的模式
  3. 异步回调+事件驱动, 例如node.js
  4. 用户态线程/协程/纤程/绿色线程, 例如goroutine

其中, 进程消耗系统资源相对较大, 因此多进程并不适合高并发场景; 多线程避免了进程的堆, 地址空间等资源的重复分配, 相比于多进程, 大大降低了多任务并行调度的开销; 回调+事件轮询的处理模型采用了不同的思路, 通过非阻塞的方式保持CPU的持续运转; 用户态线程则是将线程的调度逻辑从内核态转移到了用户态, 相较于多线程进一步地减少了调度的开销, 实现了更细粒度的控制.

用户态线程的优势主要在于:

  1. 调度代价小: 用户态线程避免了特权级的转换, 而且仅使用部分寄存器即可完成上下文切换(见下文实现).
  2. 内存占用少: 内核线程的栈空间通常为1-2MB, 用户态线程(如goroutine)栈空间最小可以到2KB, 一个golang程序可以轻松支持10万级别的goroutine运行, 作为对比, 1000个系统线程已经需要至少1-2GB的内存了.
  3. 解决回调地狱: 用户态线程可以简化异步回调的代码, 提升开发人员编码的简洁性和可读性.

实现原理

线程结构体

为了实现绿色线程, 我们首先需要确定描述一个线程需要哪些信息. 根据线程的定义不难发现, 描述线程的结构体应该包括:

  • 线程ID
  • 运行状态
  • PC
  • 通用寄存器

x86_64架构下, 上述线程描述可以用以下代码来表示:

struct Thread {
    _id: usize,
    stack: Vec<u8>,
    ctx: ThreadContext,
    state: State,
}

struct ThreadContext {
    rsp: u64,
    r15: u64,
    r14: u64,
    r13: u64,
    r12: u64,
    rbx: u64,
    rbp: u64,
}

enum State {
    Available,
    Running,
    Ready,
}

继续阅读“绿色线程: 原理与实现”

rCore-OS Lab3: Time-sharing Multi-tasking

Lab3: Time-sharing Multi-tasking

In lab2, we implemented a Batch-Processing OS, allowing users to submit a bunch of programs at once then just wait for the result(s). Besides, we have made some basic security checks to prevent memory fault(or attack) in user’s programs influencing the other ones or OS. Despite the large labor-saving, it is still a far cry from a modern OS.

Think about how the OS behaves nowadays: Multi-tasking(you feel like doing many works at the same time), Real-time interaction(whenever click or press a key you get responses instantly), Memory Management, I/O Devices Management, and Networking utilities. It is those features, supported by complicated underlay mechanisms, that let us operate computers in a satisfying and efficient way. And in this lab, we are going to address the Multi-tasking problem, which takes an essential step towards our modern OS target.

The basic idea of multi-tasking on a single CPU is very simple: we run each task for a small piece of time, then switch to the next task and repeat this procedure. If we switch fast enough then it looks like we are running many programs at the same time.

The cruxes:

  1. How do we allocate memory of the programs? We need to preserve the task context (registers, stack, etc) in memory so that when we switch back and everything goes fine as before.
  2. How to switch between tasks? The OS code cannot run when the user’s programs occupy the CPU, so we need to seize this power from the user’s programs, without destruction to them.
  3. How do we schedule those tasks? What is the proper time interval to perform task switching? How do decide which one should run next?

In the following parts, we will discuss these problems, one by one.

继续阅读“rCore-OS Lab3: Time-sharing Multi-tasking”

Intel SGX: 基本概念

SGX是Intel实现的可信执行环境,主要面向服务器和桌面端,提供了内存加密(Memory Encryption)、访问控制(Access Control)、远程认证(Remote Attestation)、本地密封(Sealing)等功能。

0x00 Overview

关于应用程序代码与可信执行环境的基本关系:

  1. 每个application分为两部分:安全(可信)部分和不安全(不可信)的部分
  2. application启动后,会在受保护的可信内存中加载一块飞地(enclave)
  3. application通过把机密数据、代码放到enclave里来保证安全性
  4. enclave为application提供调用接口,当application调用enclave内的函数时,其内部的任何内存仅enclave自身可见
  5. enclave内存即使ring 0的攻击者也看不到,因为是CPU层面的保护。实际上在SGX的安全模型里OS、BIOS等等都可以被认为是不可信的

关于可信执行环境与用户进程的关系:

  1. application 本身包括了自身的代码、数据和enclave
  2. enclave里面也有其自身的代码、数据
  3. SGX保证enclave里面的代码和数据的integrity和confidentiality
  4. enclave的entry points在编译期就确定了
  5. enclave可以访问它所在的application里的内存,但是反过来不行
  6. 支持多线程


继续阅读“Intel SGX: 基本概念”

rCore-OS Lab2: Batch Processing and Privileges

In lab 1, we have made our code work on a bare-metal computer (simulated by QEMU) successfully. However, it can do nothing but print some strings we hardcoded in the program on the terminal. Of course you can make it more complicated, such as factoring a large number, calculating the inverse of a matrix, etc. That’s cool but there are two significant drawbacks of this approach:

  1. The CPU runs a single program each time. Since the computing resources are precious(especially in the old time when you don’t have a modern OS), users who have many programs to run have to wait in front of the computer and manually load&start the next program after the previous one finished.
  2. Nobody wants to write the SBI and assembly level stuff every time, and it’s a duplication of efforts.

In order to solve these problems, people invented the Simple Batch Processing System, which can load a batch of application programs and automatically execute them one by one. Besides, the Batch Processing System will provide some “library” code such as console output functions which may be reused by many programs.

A new problem arises when we use the batch process system: error handling. The user’s program may (often) run into errors, unconsciously or intentionally. We do not want the error of any program to affect others or the system, so the system should be able to handle these errors and terminate the programs when necessary. To achieve this goal we introduced the Privileges mechanism and isolate user’s code from the system, which we will refer to as user mode and kernel mode. Note that this mechanism requires some support from hardware, and we will illustrate that with code in the following parts.

0x00 Privileges mechanism

The underlying reason for implementing the privileges mechanism is the system cannot trust any submitted program. Any errors or attacks could happen and may corrupt the system. We have to restrict users’ programs in an isolated “harmless” environment, where they have no access to 1) arbitrary memory or 2) any over-powerful instructions which may break the computer. In this lab, we mainly focus on the last point.

Prohibiting users’ program from using privileged instructions need the help from CPU. In riscv64, 4 levels of privileges are designed:

Level Encode Name
0 00 U, User/Application
1 01 S, Supervisor
2 10 H, Hypervisor
3 11 M, Machine

All modes, except Machine, have to go through binary interfaces provided by higher levels to control the hardware. The privileges level and their relation in our scenario are shown in the following figure:

The binary interfaces between User mode and Supervisor mode are named Application Binary Interface (ABI), or another more famous one: syscall.
继续阅读“rCore-OS Lab2: Batch Processing and Privileges”

rCore-OS Lab1: A Trilobite OS

Well I admit that I am too lazy to transfer this article back to Chinese.

I am going to practice my operating system skills by learning through the rCore-OS of THU, which is a pretty OS written in Rust. It is Linux compatible and its target platform is RISC-V. In this article, we will build a very naive but bare metal program.

0x00 Get rid of standard library dependencies

This is the first challenge for any software developer start moving to system development: You can not rely on ANY standard libraries (glibc, uclibc, klibc or any other implementations), since the OS itself is the one responsible for providing these libs. Let’s try to get rid of them.

In Rust and C/C++ (and almost all programming languages), before running into main(), the execution environment will do some initialization work, where the std library and other standard libraries (GNU libc) may be used. Thus we have to tell Cargo there is no main and std in our target.

// os/src/main.rs
#![no_std]
#![no_main]

And we need to explicitly write a _start() function, which is the entry Cargo is looking for.

// os/src/main.rs
#[no_mangle]
extern "C" fn _start() {
    // Nothing here now
}

Besides, Cargo requires us to provide panic_handler or it will not compile. Usually the std will take care of that but now we have to manually add a panic_handler.

// os/src/lang_items.rs
use core::panic::PanicInfo;

#[panic_handler]
fn panic(_info: &PanicInfo) -> ! {
    // Nothing here now
}

Note that the rust-core can be used (and very useful) on bare metal.

Next, we need to make it possible to run our program directly on CPU without any OS support.

0x01 Make the CPU run it

For an odinary program, running it is easy: All you have to do is type it’s name in a shell and hit Enter, or double-click the exe file in Windows. That ease is benefiting from the OS. As we are creating an OS, things can get a little more complicated. Let’s first think about what will happen when the CPU starts to working.

The bootloadr for QEMU can be found at: https://github.com/itewqq/rCore-dev/tree/main/bootloader

When the CPU (riscv64 emulated by QEMU in our case) is powered on, the other general registers of the CPU are cleared to zero, and the PC register will point to the 0x1000 location. This 0x1000 location is the first instruction executed after the CPU is powered up (a small piece of boot code solidified in the hardware), and it will quickly jump to 0x80000000, which is the first instruction of the BootLoader program – RustSBI. After the basic hardware initialization, RustSBI will jump to the operating system binary code memory location 0x80200000 (for QEMU) and execute the first instruction of the operating system. Then our written operating system starts to work.

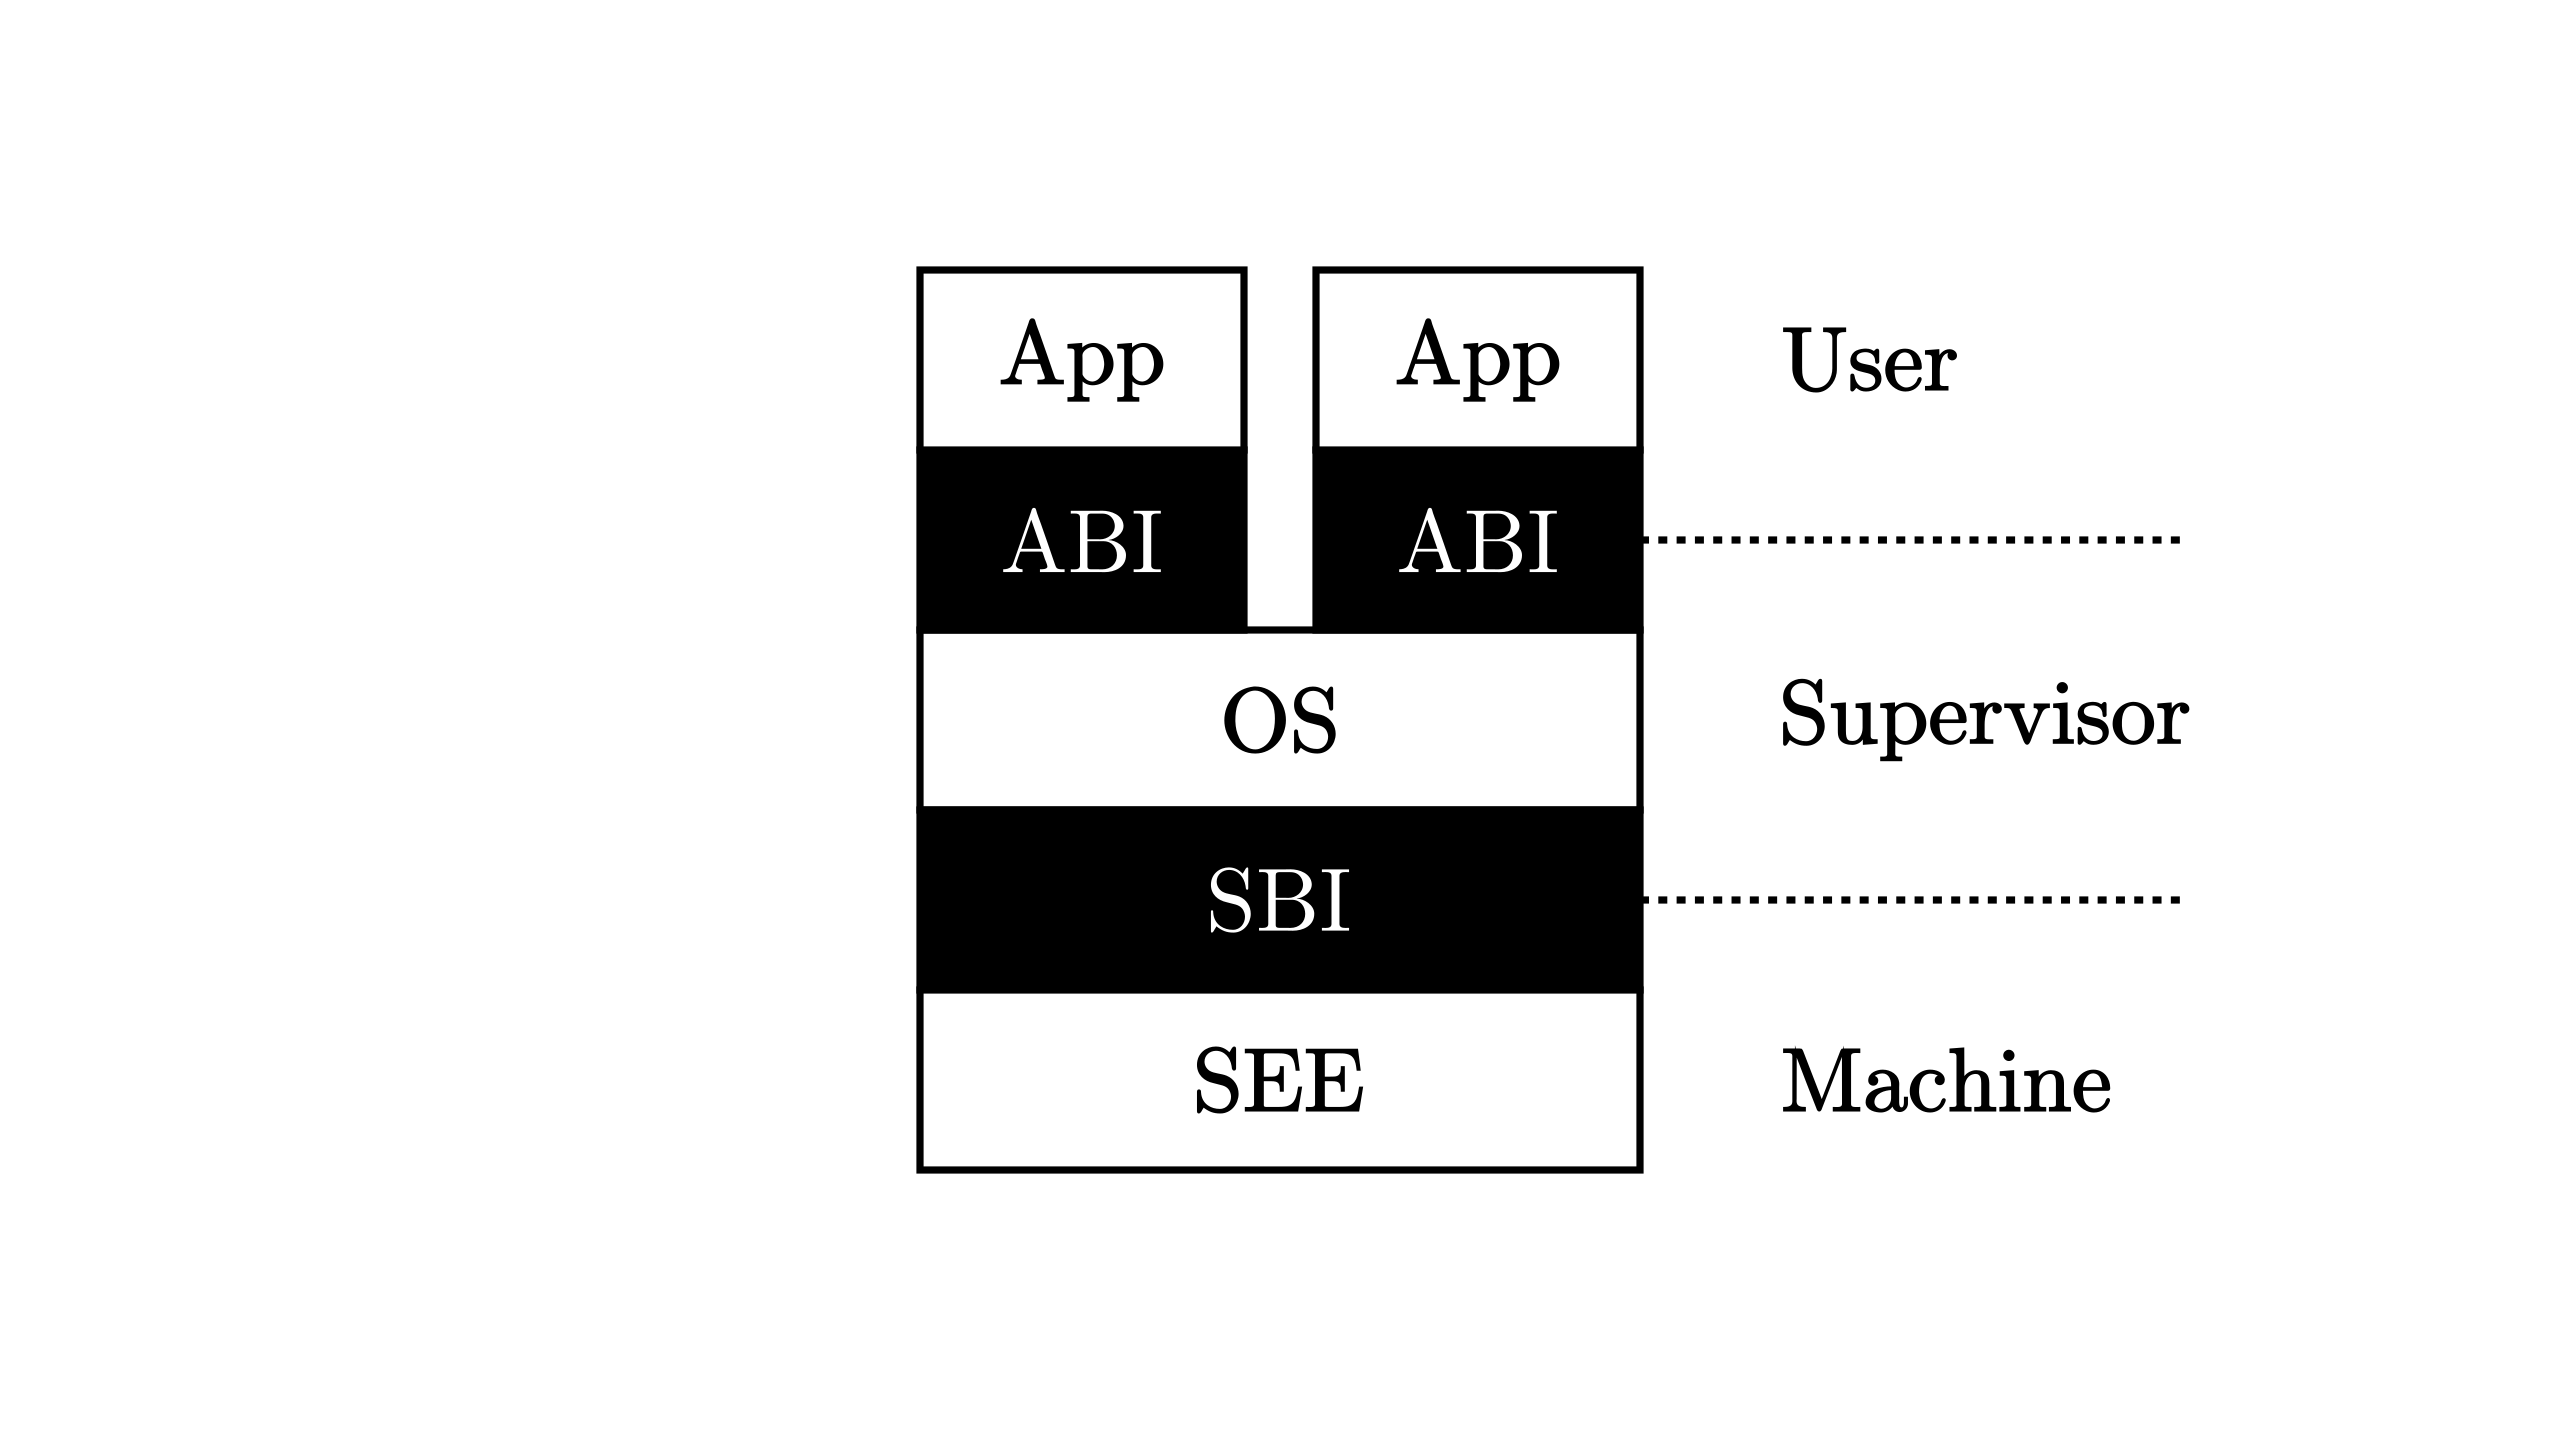
About the SBI: SBI is an underlying specification for RISC-V. The relationship between the operating system kernel and RustSBI, which implements the SBI specification, is somewhat like the relationship between an application and the operating system kernel, with the latter providing certain services to the former. However, SBI provides few services and can help the OS kernel to perform limited functions, but these functions are very low-level and important, such as shutting down the computer, displaying strings, and so on. If RustSBI provides services, then the OS kernel can call them directly.

So it’s clear that we have to put our built OS at the 0x80200000 address (for QEMU). By default, Cargo adopts a usermode memory layout which is not we expected, for example we will not get a entry address at 0x80200000 in the generated binary. To address that we need a custom linker script to make every section’s location right:

OUTPUT_ARCH(riscv)
ENTRY(_start)
BASE_ADDRESS = 0x80200000;

SECTIONS
{
    . = BASE_ADDRESS;
    skernel = .;

    stext = .;
    .text : {
        *(.text.entry)
        *(.text .text.*)
    }

    . = ALIGN(4K);
    etext = .;
    srodata = .;
    .rodata : {
        *(.rodata .rodata.*)
        *(.srodata .srodata.*)
    }

    . = ALIGN(4K);
    erodata = .;
    sdata = .;
    .data : {
        *(.data .data.*)
        *(.sdata .sdata.*)
    }

    . = ALIGN(4K);
    edata = .;
    .bss : {
        *(.bss.stack)
        sbss = .;
        *(.bss .bss.*)
        *(.sbss .sbss.*)
    }

    . = ALIGN(4K);
    ebss = .;
    ekernel = .;

    /DISCARD/ : {
        *(.eh_frame)
    }
}

Then we force Cargo to use it in linking:

// os/.cargo/config
[build]
target = "riscv64gc-unknown-none-elf"

[target.riscv64gc-unknown-none-elf]
rustflags = [
    "-Clink-arg=-Tsrc/linker.ld", "-Cforce-frame-pointers=yes"
]

继续阅读“rCore-OS Lab1: A Trilobite OS”